Posts

Cricket Bowling Slide Assemble | Indoor / Tabletop Cricket | Cricket Boa...

Image
How to Make tabletop cricket or Indoor Cricket? In this video you going to see unexpected design for Indoor cricket, especially for Cricket fans. In this Video the Bat components assemble are clearly recorded by Majestic King MK. Its take 4 months time to design and making will take around 2 months. If you like to appreciate my hard-work and creativity, kindly subscribe and hit the like icon. FYI - All Copyrights received. So Just make it for fun, not for business purpose. NO COPYRIGHT FREE BACKGROUND MUSIC: 🎵 Track Info: Song: Markvard - Time (Vlog No Copyright Music) Music provided by Vlog No Copyright Music. Video Link: https://youtu.be/NvZ3CN-vvsw

Table cricket Bat Dissemble | Indoor Cricket | Tabletop Cricket | Cricke...

Image
How to Make tabletop cricket or Indoor Cricket? In this video you going to see unexpected design for Indoor cricket, especially for Cricket fans. In this Video both the Bat components and Bowling components are design by Majestic King MK. Its take 4 months time to design and making will take around 2 months. If you like to appreciate my hard-work and creativity, kindly subscribe and hit the like. FYI - All Copyrights received. So Just make it for fun, not for business purpose.

Table Cricket Bat Assemble | Indoor Cricket | Tabletop Cricket | Cricket...

Image
How to Make tabletop cricket or Indoor Cricket? In this video you going to see unexpected design for Indoor cricket, especially for Cricket fans. In this Video both the Bat components and Bowling components are design by Majestic King MK. Its take 4 months time to design and making will take around 2 months. If you like to appreciate my hard-work and creativity, kindly subscribe and hit the like. FYI - All Copyrights received. So Just make it for fun, not for business purpose.

Table Cricket | Indoor Cricket | Tabletop Cricket | Cricket Board Game |...

Image
How to Make tabletop cricket or Indoor Cricket? In this video you going to see unexpected design for Indoor cricket, especially for Cricket fans. In this Video both the Bat components and Bowling components are design by Majestic King MK. Its take 4 months time to design and making will take around 2 months. If you like to appreciate my hard-work and creativity, kindly subscribe and hit the like. FYI - All Copyrights received. So Just make it for fun, not for business purpose.

DC motor controlled by Gyro MPU 6050 using Arduino & L298N Motor driver - Wireless Connection

Image
Circuit Diagram: Required Components: Arduino uno/nano - 1 Nos Battery - 1 Nos DC Motor - 2 Nos L298N Motor Driver - 1 Nos Gyro MPU6050 - 1 Nos Transceiver - 2 Nos Program Code: Transmitter Code: #include <SPI.h>        #include "RF24.h"       #include "Wire.h"       #include "I2Cdev.h"     #include "MPU6050.h"   MPU6050 mpu; int16_t ax, ay, az; int16_t gx, gy, gz; int data[2]; RF24 radio(9,10);                                uint64_t pipe = 0xE8E8F0F0E1LL; void setup(){   Serial.begin(9600);   Wire.begin();   mpu.initialize();   radio.begin();                  ...

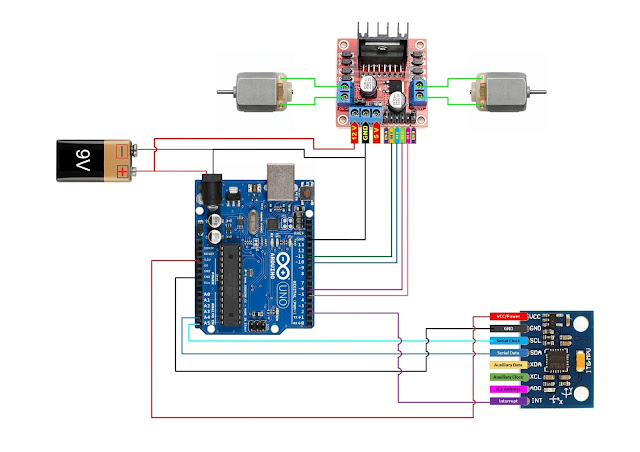
DC motor controlled by Gyro MPU 6050 using Arduino & L298N Motor driver - Wired Connection

Image
Circuit Diagram: Required Components: Arduino uno/nano - 1 Nos Battery - 1 Nos DC Motor - 2 Nos L298N Motor Driver - 1 Nos Gyro MPU6050 - 1 Nos Program Code: #include <Wire.h> #include <MPU6050.h> #define motor1_pin1 5 //PWM - Digital Pins #define motor1_pin2 6 //PWM - Digital Pins #define motor2_pin1 9 //PWM - Digital Pins #define motor2_pin2 10 //PWM - Digital Pins MPU6050 gy_521; int16_t ax, ay, az; int16_t gx, gy, gz; int motor1_speed1; int motor2_speed1; int motor1_speed2; int motor2_speed2; void setup ( ){ Wire.begin( ); Serial.begin (9600); Serial.println ("Initializing MPU and testing connections"); gy_521.initialize ( ); Serial.println(gy_521.testConnection( ) ? "Successfully Connected" : "Connection failed"); delay(1000); Serial.println("Reading Values"); delay(1000); } void loop ( ){ gy_521.getMotion6(&ax, &ay, &az, &gx, &gy, &gz); ax = map(ax, -17000, 1...

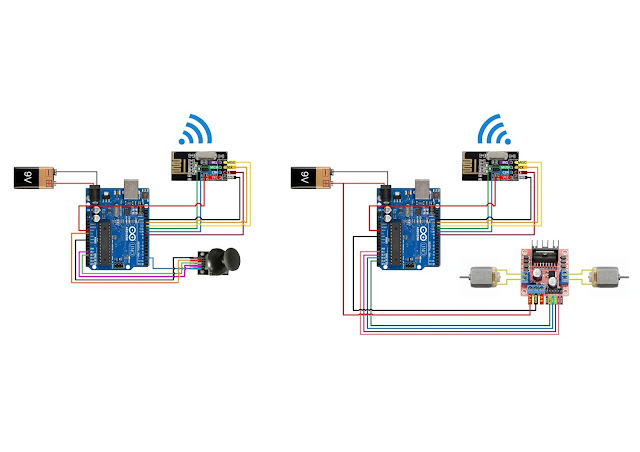
DC motor controlled by Joystick using Arduino & L298N Motor driver - Wireless Connection

Image
Circuit Diagram: Required Components: Arduino uno/nano - 1 Nos Battery - 1 Nos DC Motor - 2 Nos L298N Motor Driver - 1 Nos Joystick - 1 Nos Transceiver - 2 Nos Program Code: Transmitter Code: #include <SPI.h> #include "RF24.h" int x_axis = A1; int y_axis = A2; int xvalue; int yvalue; int data[2]; RF24 radio(9,10); const uint64_t pipe=0xE8E8F0F0E1LL; void setup() { Serial.begin(9600); radio.begin(); radio.openWritingPipe(pipe); } void loop() {{ xvalue=analogRead(x_axis); xvalue=map(xvalue,0,1023,0,127); data[0]=xvalue; radio.write(data,1); } { yvalue=analogRead(y_axis); yvalue=map(yvalue,0,1023,128,255); data[0]=yvalue; radio.write(data,1); } Serial.println(xvalue); Serial.println(yvalue); } Receiver Code: #include <SPI.h> #include "RF24.h" const int motorforward = A1; const int motorbackward = A2; const int motorleft = A3; const int motorright = A4; int data[2]; RF24 radio(9,10); // CE,CS...